Introduction
This guide provides step-by-step guide to access the Block Tree Application and manage your digital asset portfolio. Block Tree Application enables users to:
- Manage wallets, including external wallets
- View portfolio balances and asset allocation
- Deposit and withdraw assets
- Export historical reports
System Access
Step 1: Login
- Open the invitation email from Block Tree and click Accept Invite.

- Set up Two-Factor Authentication (2FA) using your preferred authenticator app. Scan the QR code displayed, or enter the Secret Key manually if scanning is not available.

Note: The terms 2FA, TOTP and MFA all refer to the same authentication terminology.
Important: Save your recovery codes before continuing. You will need them to access your account if you ever lose your authenticator device. Click Copy All Codes, store them securely, then click "I've saved my recovery codes — Continue" to proceed.
- Complete the 2FA verification by entering the 6-digit code from your authenticator app, then click Verify.

4. Set your password (optional). If you choose to skip this step, a magic link will be sent to your email each time you log in.

Once completed, you will be redirected into the Block Tree Application.
Step 2: Account Management
To manage your account settings — such as resetting your password or removing your 2FA authenticator — follow these steps:
- In the sidebar, click the APPS tab, then select Admin Portal from the options that appear.

- The Manage Account page allows you to:
- Reset your password — click Send Password Reset Email.
- Remove your 2FA authenticator — click Delete TOTP MFA.

Application Overview
Portfolio
After logging in, you will arrive at the Portfolio page – your main dashboard. It provides an at-a-glance view of your portfolio balance, connected wallets and current asset holdings.
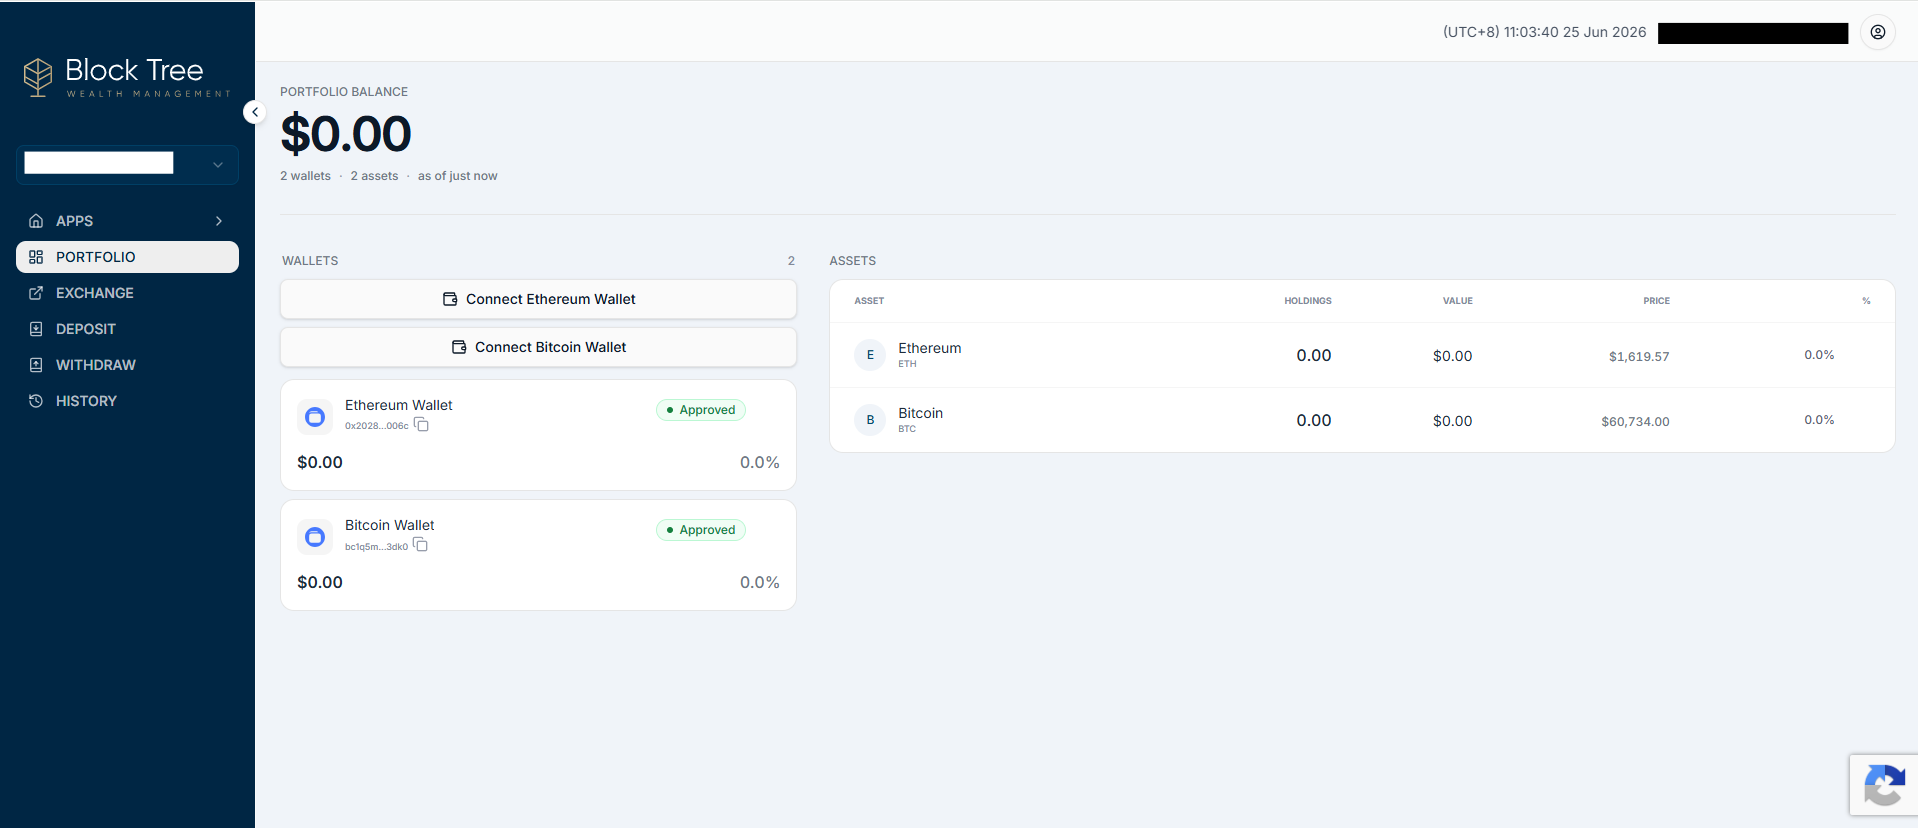
- Wallets — displays all connected wallets (Ethereum, Bitcoin, or other supported wallets). Use the Connect buttons to add new wallets.
- Assets — shows each asset held across your wallets, with current holdings, value, price and allocation percentage.
- The left sidebar provides navigation to Portfolio, Exchange, Deposit, Withdraw and History.
Fusang Exchange
Exchange in the left sidebar will redirect you to the Fusang Exchange platform. From here, you can trade listed securities and digital assets.

Deposit
Select Deposit from the left sidebar to open the Deposit page. From here, you can fund your wallet by sending assets to your unique deposit address.
To deposit an asset:
- Select the asset you wish to deposit from the Asset dropdown (e.g. Ethereum / ETH).
- Confirm the network — ensure it matches the network you are sending from.
- Your source wallet and deposit address will be displayed, along with a QR code for convenience.
- Click Copy Address to copy your deposit address, then send asset from your external wallet to that address.
.png)
Important: Send only the selected asset on the correct network. Asset sent on an incorrect network CANNOT be recovered.
Withdraw
Select Withdraw from the left sidebar to open the Withdraw page. From here, you can send assets from your wallet to a pre-verified recipient wallet.

To withdraw an asset:
- Select the asset you wish to withdraw from the Asset dropdown (e.g. Ethereum / ETH).
- The network is auto-selected based on the asset chosen.
- Select your source wallet to withdraw from.
- Choose a linked recipient wallet. Only wallets you have verified ownership of are eligible to be a recipient wallet.
- Enter the amount, or use the 25%, 50%, 75%, or Max shortcuts.
- Review the summary panel on the right — it shows the amount to send, network fee, and total.
- Click Confirm withdrawal to proceed.
.png)
Important: Withdrawals are irreversible once broadcast to the network. Please VERIFY the recipient wallet address and amount carefully before confirming.
History
The History page gives you a complete record of your Swap and Transfer activity across all connected wallets, including archived records from previous platforms.

The History page is organised into four tabs:
- Swap — a record of asset swaps executed on Fusang Exchange.
- Transfer — records of on-chain deposits and withdrawals.
- Transfer Archive — older transfer records from the legacy platform.
- Transaction Archive — older transaction records from the legacy platform.
Swap
The Swap tab is shown by default. Use the filters to narrow results by symbol, wallet address, transaction type, or date range. You can also customise the visible columns or export the full list as a CSV using the Download CSV button.
%20.png)
Transfer
Clicking the Transfer tab displays on-chain deposit and withdrawal records. Unlike the Swap tab, Transfer history includes EVM and BTC sub-filters to narrow results by network and shows Transaction and Amount columns.
%20.png)
Transfer Archive
The Transfer Archive tab contains older transfer records migrated from the legacy Fusang Vault platform. It provides a more detailed column set including Operation, From/To addresses, Sent and Received Asset, USD values, Tx Hash, Fee, Network Fee, Status, and Reason.
%20.png)
Transaction Archive
The Transaction Archive tab contains legacy transaction records from the Fusang Exchange platform, displaying ID, Transaction, Timestamp, Type, Quantity, Post Balance, Currency, and Status.
%20.png)
Support
If you encounter any issues or have questions about using the Block Tree Application, our Client Support Team is here to help.
- Reach us at support@blocktree.co
- For account-specific queries, please use your registered email address when reaching out.
We hope this guide has helped you get started with Block Tree. Welcome aboard.